
After installing the software, the next step is to select your conversion settings.
Tip: It’s helpful to have QuickBooks open to the Chart of Accounts list while doing this.
Select a conversion settings file:
The conversion settings control how your transactions are posted to QuickBooks. Settings with a red asterisk * are required; the others are optional.

Scroll down for explanations and examples of each setting

The credit card account to which all transactions (charges, refunds, and payments) will be posted. This is the "control" or "master" account.
Examples:
Rules:

Specify the account from which payments are made to pay down the credit card.
Usually, this is a checking account.
Examples:
Rules:

Tell Statement Converter how to assign the distribution account.
The most common choices are Default QB debit/credit account and Lookup table, then default.

Default QB debit/credit account Common choice
All debits will be posted to a single account and all credits will be posted to a single account.
Enter the name of the debits account in Default QB Debit account name
Enter the name of the credits account in Default QB Credit account name
Account from the statement
Transactions will be posted to the account specified in your statement.
This applies only for statements where the transactions contain account names — most don’t.
If this option is selected and your statement does not specify accounts, debits will be posted to the Default QB Debit account name and credits will be posted to the Default QB Credit account name.
Lookup table, then statement, then default
If you are using Statement Converter’s Lookup feature and a match is found, the transaction is posted as specified in the lookup table.
If there’s no match, the program looks for an account name in the statement transaction.
If the statement does not specify an account, the transaction is posted to the Default QB Debit account name or Default QB Credit account name, as appropriate.
Lookup table, then default Common choice
If you are using Statement Converter’s Lookup feature and a match is found, the transaction is posted as specified in the lookup table.
If there’s no match, the transaction is posted to the Default QB Debit account name or Default QB Credit account name, as appropriate.
See also: The Lookup Feature

The default distribution account to which credit card charges and refunds will be posted.
This is usually an expense account. It’s different from the QB Payment Account.
Examples:
Rules:
See also: QB Expense Account Type

Select the TYPE of QuickBooks account you entered in Default QB Expense Account NAME.
Typically, this is Expense or Cost of Goods Sold.
All QuickBooks account types are supported:
See also: The Lookup Feature

Statement Converter has several options for importing the payee/vendor names:

If you’re not concerned with tracking individual vendors (e.g. you just want to total the expenses), you can assign a generic or "dummy" vendor name to every transaction.
For example, if your generic Vendor name is "??", your imported transactions would look like this:

Advantages: Easy to implement — just select this setting and your’re done.
Disadvantages: If you want your transactions to have the correct Vendor name, after importing you’d have to edit each transaction in QuickBooks.
Examples:
How to: Select Default QB Vendor name and enter the name of the default vendor in the field Default QB Vendor name.
You can use the payee or description text from your statement as the Vendor name. This option is best when your statement has clean payee names (most don’t).
For example, your imported data might look like this:

Advantages: Easy to implement — just select this setting and you’re done.
Disadvantages: Most statements include other text with the payee name, so your QB Vendor list will have junk names. To clean up the data, you’d have to edit each transaction in QuickBooks.
How to: Select Payee text from the statement, then default and enter the name of the default vendor in the field Default QB Vendor name.
Use the Lookup feature matching rules to connect your actual Vendors to the descriptions in your statement.
Lookup rules look like this:

In addition, the Lookup feature can assign the expense account and class, too.
Advantages: This is the most customized way to import your transactions. Payees that aren’t found in the lookup list can be assigned a default name -or- the payee text from the statement.
Disadvantages: You have to manually enter and maintain the lookup entries. It does not link automatically to your QuickBooks vendor or account lists.
How to: Select Lookup table and enter the name of the default vendor in the field Default QB Vendor name.
More info: LOOKUP FEATURE INSTRUCTIONS

This default vendor name is assigned if you don’t use the payee name from the statement, or don’t use the Lookup feature, or if no Lookup rule matches.
For a one vendor credit card, where all purchases are from a single company, such as Home Depot, enter the name of the vendor.
Examples:
For a typical credit card where each payee is different, such as a Visa/Mastercard/Amex, enter a generic, default name.
Examples:
Rules:
See also: Assign Vendor Names, Lookup Feature

Select how Statement Converter should assign the Class to transactions (not all companies use Classes).

Do not assign a class
Class names will not be assigned to transactions (Don’t know what Classes are? select this).
Default QB Class
All transactions will be assigned the Class you set in Default QB Class.
Class from the statement
Transactions will be assigned the Class specified in the statement transaction (only for statements that have this data).
If a class is not found in the statement, a class will not be assigned.
Lookup table, then statement
If you are using Statement Converter’s Lookup feature and a match is found, the Class is assigned as specified in the lookup table.
If there is no match or you are not using the Lookup feature, the program will look for a Class name in the statement.
If the statement does not specify a class, a class will not be assigned.
Lookup table
If you are using Statement Converter’s Lookup feature and a match is found, the Class is assigned as specified in the lookup table.
If there is no match, or you’re not using the Lookup feature, the program will use the Default QB Class.
See also: Default QB Class, The Lookup Feature

If you are using Classes, set the default QB Class name.
Examples:
Rules:
See also: Assign Classes, The Lookup Feature
The Lookup feature matches transactions to your QuickBooks Vendors, Accounts, and/or Classes.
To enable this feature:
checkmark Use Lookup feature. Click in the filename field and browse to your lookup table (the default is vendor_list.xls)

select which transaction data should be assigned using Lookup rules:

See the complete instructions for the Lookup Feature.
Imported transactions can be marked as "Cleared" in the account register.
To mark them as cleared, checkmark this option. To import as not cleared, uncheck this option.
for bank checks only: import new check transactions as "to print" (for later printing)
To mark new check transactions To be printed, checkmark this option. To import normally, uncheck this option.
Each time you convert, would you like to be prompted, "Confirm your QuickBooks settings?"
To prompt, checkmark this option. To skip confirmation, uncheck this option.
When converting is finished, should the program close the statement file?
This is merely a convenience feature — it doesn’t affect converting. To close the file, checkmark this option. To leave your file open, uncheck this option.
The payee names on your statement often include extraneous text, such as a phone number, city name, store ID number, etc. Usually, you don’t want that extra text imported because it will clutter up the Vendor List with nonsense names. Statement Converter can drop the extra text if there are two or more spaces separating the data.
Example:
The payee name in this transaction is "SCOOPS OF PARADISE QPS HALEIWA" but we don’t want all that imported as a Vendor name; we just want "SCOOPS OF PARADISE":
![]()
Statement Converter can drop the extra text because there are multiple spaces in it. Set Cut vendor name after to 2 and any text after 2 spaces will be ignored when assigning the Vendor name.
This setting is used only when Assign Vendor Names is set to Payee text from the statement or Lookup table, then statement, otherwise this setting has no effect.
The default setting is 0 (zero) which means off/disabled. The recommended setting is 2.
Example: 2
Statement Converter can import text into the QuickBooks Memo field. This can be useful when reviewing the transaction later.
The choices for importing memo text are:
Transaction dates can be set to match your locale: month/day/year or day/month/year.
Users of the US version should use the default setting, MDY.
Users whose need dates as D/M/Y (e.g. UK) should use DMY.
You shouldn’t change values in this section unless instructed.
The output file can be saved in different formats. The default output is TAB (tab-delimited).
International users: if QuickBooks will not accept the transaction dates when importing, set this to TAB_NOLOCAL or CSV_NOLOCAL. This adjusts how the dates are saved in the IIF file.
(NOLOCAL forces dates to be saved in the format of US English, the language upon which VBA is based. Otherwise, dates are saved using the local language of your Microsoft Excel, including control panel settings.)
This sets the filename extension of the QuickBooks file.
QuickBooks expects .IIF. To override it, set it here. This setting is optional; if not set it defaults to ".IIF".
Example: .IIF

When saving the conversion settings, you may specify the filename. This is useful when you have multiple accounts from the bank.
Example: Your QuickBooks bank account is named "Checking" but you mistakenly enter the setting as "Chking". The transactions will be imported into a new account "Chkng".
To correct this, you can:
Example: You have an account 6905 Maintenance. Enter it as: 6905 or Maintenance
parent-account:sub-account:sub-account (account names separated by a colon).
Example: You have a parent account 2100 Credit cards and your Home Depot card is
account 2105 Home Depot. Enter the setting as: Credit cards:Home Depot
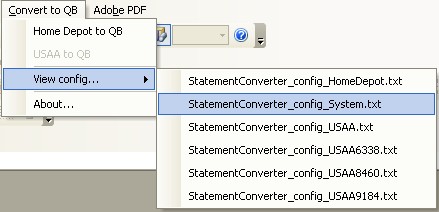
The View config... option is available only when there’s a conversion settings file in the same folder as the statement (Excel worksheet) you have open.
If the menu option for View config... is dimmed/disabled, like this:

do this:
The menu should now be enabled.
If you are importing multiple accounts from the same bank/vendor, you’ll probably want to post the transactions to their respective accounts. To do this, simply create separate conversion settings for each account.
Example: you have one credit card for business expenses and another for personal expenses, both cards from the same bank
Enter the settings for the first account, and save them with a name that indicates the account, such as SC_config_WellsFargo_CC_BUSINESS.txt
Adjust the settings for the second account, and save them with a reminder name such as SC_config_WellsFargo_CC_PERSONAL.txt
Or, use the account numbers in the filename:
SC_config_USAA_BA-1234.txt
SC_config_USAA_BA-5678.txt
Or, indicate the cardholder name:
SC_config_AmericanExpress_CC-Joe.txt
SC_config_AmericanExpress_CC-Sally.txt
Important: The filename must include _config_ and _BA or _CC in the filename.
Tip: Put your helpful reminder text at the end of the filename, just before .txt
Set the preference to be prompted for which conversion settings to use
From the Convert to QB menu, select Preferences... and check the box.


Convert a statement
When you convert a statement, the program will prompt you to select the conversion settings to use:

If you decide not to convert, click Cancel conversion.
If you select the wrong settings, simply convert again before importing into QuickBooks.
Tip: After entering the settings for one account, you can copy your settings to a new file by using Save settings as...
You may also manually copy settings files directly from the operating system.
The standard Statement Converter program posts each transaction to a single expense account. There is an add-on to split transactions among multiple accounts. You can also edit them in QuickBooks. To purchase the add-on, please submit a support request.
After converting, the program can email the converted file to someone (bookkeeper/accountant/therapist). Please submit a support request for instructions.
That’s it! Statement Converter is ready. Just convert your statements and import the transactions into QuickBooks.
Continue with: How to Use the Program
Go back to: Install the Software
Return to: Main Page