website logo
The Lookup Feature (Matching Rules)

The Lookup feature automatically matches the transactions on your statement to your QuickBooks Vendors, Accounts and even Classes (which QuickBooks itself cannot do!). The rules are flexible — they can be quite general to very specific.

Should You Use the Lookup feature?

The Lookup feature is most useful when you have multiple transactions with the same vendors. The initial setup takes about 15 minutes and the time to refine and maintain the rules depends on how many vendors you have. Let’s see if it would be worthwhile in your situation:

Consider using the Lookup feature if:

  • you’ll use Statement Converter more than once (e.g. monthly, yearly)
  • you have multiple transactions with your vendors (e.g. you shop at Home Depot more than once)

Using the Lookup feature might not be worthwhile if:

  • you’ll use Statement Converter only once (e.g. this is a one-time, catch-up project)
  • most of your transactions are one-off purchases from different vendors (e.g. you don’t buy from the same vendor more than once)
How it Works
  • You create matching rules in a spreadsheet list.
  • Statement Converter tries to match your transactions to the rules.
  • Matches are assigned to the specified Vendor, Account, and/or Class.
  • If there’s no match, the default Vendor, Account, and/or Class are used from your conversion settings.
Matching Rules

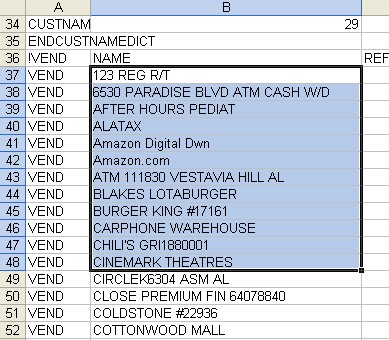
Matching rules are listed in an Excel worksheet which you maintain, like this:

Sample "Lookup file" layout

The program reads down column A and stops at the first match.

A file with sample rules is provided with the program. Here is the sample file which you may download.

Enable/Disable Matching

To use the Lookup feature, enable it in your conversion settings:

  1. checkmark Use Lookup feature then click in the filename field to select the lookup table. The default is vendor_list.xls:

    Lookup feature - enabled

  2. select Lookup table for each field you want to auto-fill:

    Lookup feature

Create Your Matching Rules

Tip: It’s helpful to have QuickBooks open to your Chart of Accounts when updating your rules.

Quick Start: copy your QB Vendors into Statement Converter

If you already have Vendors in your QuickBooks company, the fast way to get started is to export your Vendors from QuickBooks and copy them into Statement Converter:

  1. Using Excel, open your Statement Converter lookup file (e.g. Vendor_list.xls).
    If you don’t have the file, you can download this sample.
    Leave Excel open.
  2. In QuickBooks, export your vendor list:

    select FILE > UTILITIES > LISTS TO IIF FILES

    checkmark Vendor List

    click OK

    Export vendor list from QuickBooks

  3. Save the exported vendor list, naming it QB Vendors. QuickBooks automatically assigns the extension .IIF, so the final filename will be QB Vendors.iif.
  4. Back to Excel, select FILE > OPEN and browse to the file you just saved, QB Vendors.iif.

    (NOTE: do not double-click the filename from your hard disk folder to open it; QuickBooks will attempt to open it and display an error).

  5. Scroll down to the vendor names. They are labeled VEND in column A.
  6. Select the vendors you wish to add to Statement Converter (e.g. all of them). Select only the data in Column B, no other columns:

    Select vendors to copy

  7. Select EDIT > COPY to copy the names into memory.
  8. Still in Excel, switch to the Statement Converter lookup table (e.g. Vendor_list.xls) that you opened earlier: select WINDOW > 1
  9. Paste the vendor names into column A under the heading, "If the Payee Name on Statement contains..." by clicking cell A2 and then EDIT > PASTE. The names should now be listed in column A.
  10. Paste the names again in column B under the heading, "...then use this for QB Vendor name:": click cell B2 then EDIT > PASTE. The names should now be listed in column B.

Now your QB Vendors are in your lookup table. If you do a test conversion now, many of them will match already!

  1. The last steps are to specify the Distribution Accounts in column C and/or Classes in column D, according to your needs.

    Most users enter accounts in column C, but it’s not required to specify an account.

    Usually, the account in column C is an Expense account; if it’s any other type, you must enter the account type in column G.

When there’s no match

When a transaction is not matched to an entry in the Lookup table, the program will:

  1. notify you, if you have enabled that option, and
  2. assign a Vendor/Account/Class according to your conversion settings
Get notified when no rule matches
  • To be notified when a transaction does not match a lookup rule, checkmark this option:

    Option to enable warnings when transaction is not matched

  • Non-matched transactions will be highlighted in yellow and a pop-up message will inform you:

    Transaction highlighted when not matched Warning displayed when transaction is not matched

  • To help you easily update your Lookup rules, non-matched transactions are also saved in a list:

    Report of transactions not matched

    The list is saved in the same folder as your statement.

    Working from the list, you can easily adjust your rules. View the list with any text editor, such as NotePad or Word.

    You may delete the list file at any time — it’s only for your reference and does not affect the program.

Assign default Vendor/Account/Class when there’s no-match

When a transaction does not match a lookup rule, the Vendor/Account/Class name will be assigned according to your conversion settings.

Examples of conversion settings

Use one of these options with the Lookup feature:

  • Lookup table, then statement, then default: If the lookup does not match, try to get the value from the statement. If there’s no text in the statement, use the default from your settings.
  • Lookup table, then default: If the lookup does not match, use the default from your settings.
Two-Part Lookup Option

There is an option for two-part matching rules.

screenshot of two-part lookup option

Tips ’n Tricks
  • When creating lookup rules, avoid duplicate entries for the same vendor. It is harder to maintain and gets confusing:

    BAD — duplicate entries for the same payee/vendor:

    Sample "Lookup file" layout - wrong

  • Instead, consolidate. Use the text that is shared in common by the transactions:

    GOOD — the search text in column A is common to each transaction:

    Sample "Lookup file" layout - wrong

  • You can share a lookup table among multiple converters. It’s easier to maintain a single list.
  • Want to do a test conversion? The converter stops processing your statement when it reaches a blank row in the transactions. So, insert an empty row after two or three transactions, convert, and import. If you like the result, delete the transactions you just imported, remove the blank row, and convert/import all the transactions.
Rules for the Lookup table
  • The filename does not matter. You may name the file as you like.
  • The columns must be organized like the sample provided: the search text in column A, vendor name in column B, account name in column C, class name in column D, and account type in column G.
  • The text labels in the first (header) row do not matter. You may change the text, but don’t change the column order.
  • The rules must start on row 2.
  • In lookup column A, capitalization does not matter. The program will match both "Steve" and "STEVE".
  • When processing, Statement Converter reads down column A of the lookup table. If the text in column A is found within a transaction, it's a match.
  • The accounts you enter in column C are considered Expense accounts unless you specify a different type in column G.

    Example: To post purchases to a "cost of goods" account or deposits to an "income" account, you must specify "COGS" or "Income" in column G.

    If you don’t specify the correct type, when you import QuickBooks will complain, "Can't change the type of an account". If you receive that message, this help article explains how to locate and correct it.

    All QuickBooks account types are supported:

  • ACCOUNTS PAYABLE
  • ACCOUNTS RECEIVABLE
  • BANK
  • CREDIT CARD
  • COST OF GOODS SOLD
  • EQUITY
  • OTHER EXPENSE
  • OTHER INCOME
  • EXPENSE
  • FIXED ASSET
  • INCOME
  • LONG TERM LIABILITY
  • NON POSTING
  • OTHER ASSET
  • OTHER CURRENT ASSET
  • OTHER CURRENT LIABILITY
  • OPENING BALANCE EQUITY
  • RETAINED EARNINGS
  • SALES TAX PAYABLE
  • UNDEPOSITED FUNDS
  • You may use a one, combined lookup table for all your various accounts and statements. This is easier than having separate lookup tables for different statements. However, you might want separate tables if, say, you’re using the program with different company files or multiple clients.